今回作成するのはボタンを動的に切り替えられるメニューである。
これだけでは意味が分からないと思うので動作サンプルを紹介する。

通常は1つのボタンに1つの処理なので、5つボタンがあれば5つしか処理は書けないが、このメニューは▲と▼で動的にボタンを切り替えることができる。
作り方の紹介
必要なものは、
- クラスモジュール「SelectButton」
- クラスモジュール「PagedButtons」
- フォームモジュール「(任意のオブジェクト名)」
SelectButtonの作り方
クラスモジュールを挿入し、オブジェクト名を「SelectButton」に変更する。
それから以下のコードを張り付け。
Option Explicit
Public WithEvents btn As MSForms.CommandButton
Public Parent As PagedButtons
Private Sub btn_Click()
    Parent.callBack btn.Caption
End Sub

Public Property Let Enabled(e As Boolean)
    btn.Enabled = e
End Property

Public Property Let Caption(x As String)
    btn.Caption = x
End Property

Public Property Get Self() As Object
    Set Self = Me
End Property

Public Sub ReleaseObject()
    Set btn = Nothing
    Set Parent = Nothing
End Sub
PagedButtonsの作り方
クラスモジュールを挿入し、オブジェクト名を「PagedButtons」に変更する。
※複数形のsを見落とさずに。
それから以下のコードを張り付け。
Option Explicit
Private WithEvents previousButton As MSForms.CommandButton
Private WithEvents nextButton As MSForms.CommandButton
Private pageNumber As Long
Private selectButtons As Collection
Private menuItems As Collection
Public Event Selected(x As String)

Sub callBack(x As String)
    RaiseEvent Selected(x)
End Sub

Sub Init(previous_button As MSForms.CommandButton, _
    next_button As MSForms.CommandButton, _
    ParamArray select_buttons())

    Set previousButton = previous_button
    Set nextButton = next_button

    Set selectButtons = New Collection
    Dim b
    For Each b In select_buttons
        With New SelectButton
            Set .Parent = Me
            Set .btn = b
            selectButtons.Add .Self
        End With
    Next

    Set menuItems = New Collection
    pageNumber = 1
End Sub

Sub addMenuItem(menu_caption As String)
    menuItems.Add menu_caption
End Sub

Sub DrawCaptions()
    previousButton.Enabled = pageNumber <> 1
    nextButton.Enabled = pageNumber < maxPage

    Dim itemCursor: itemCursor = selectButtons.Count * pageNumber - selectButtons.Count
    Dim i As Long
    For i = 1 To selectButtons.Count
        If itemCursor + i <= menuItems.Count Then
            selectButtons(i).Enabled = True
            selectButtons(i).Caption = menuItems(itemCursor + i)
        Else
            selectButtons(i).Enabled = False
            selectButtons(i).Caption = "-"
        End If
    Next
End Sub

Private Property Get maxPage() As Long
    maxPage = roundUp(menuItems.Count / selectButtons.Count)
End Property

Private Function roundUp(x As Double) As Long
    roundUp = Int(x + 0.999)
End Function

Private Sub nextButton_Click()
    pageNumber = pageNumber + 1
    DrawCaptions
End Sub

Private Sub nextButton_DblClick(ByVal Cancel As MSForms.ReturnBoolean)
    Call nextButton_Click
    If pageNumber >= maxPage - 1 Then
        Cancel = True
    End If
End Sub

Private Sub previousButton_Click()
    pageNumber = pageNumber - 1
    DrawCaptions
End Sub

Private Sub previousButton_DblClick(ByVal Cancel As MSForms.ReturnBoolean)
    Call previousButton_Click
    If pageNumber <= 2 Then
        Cancel = True
    End If
End Sub

Public Sub ReleaseObject()
    Dim b As SelectButton
    For Each b In selectButtons
        b.ReleaseObject
    Next
    Set menuItems = Nothing
    Set selectButtons = Nothing
End Sub
ユーザーフォームの作り方
ユーザーフォームを挿入し、オブジェクト名を以下のように変更する。

btn1~btn5はCaptionと同じくオブジェクト名もbtn1~btn5にしておく。
そしてフォームのコードに以下を張り付ける。
Private WithEvents menu As PagedButtons

Private Sub menu_Selected(x As String)
    Me.Label1.Caption = x & "が選択されました。"
End Sub

Private Sub UserForm_Initialize()
    Me.Label1 = vbNullString
    Set menu = New PagedButtons

    menu.Init Me.btnPrevious, Me.btnNext, _
        Me.btn1, Me.btn2, Me.btn3, Me.btn4, Me.btn5

    Dim i As Long
    For i = Asc("A") To Asc("Z")
        menu.addMenuItem "項目" & Chr(i)
    Next
    menu.DrawCaptions
End Sub

Private Sub UserForm_Terminate()
    menu.ReleaseObject
    Unload Me
End Sub
これで完成。
このテクニックのポイント
このテクニックのポイントは、メニューボタンが押された際に発生するイベントがmenu_Selectedに集約される点だ。
Private Sub menu_Selected(x As String)
    Me.Label1.Caption = x & "が選択されました。"
End Sub
それぞれのボタンがバラバラに機能するのではなく、あたかもひとつのPagedButtonsというコントロールパーツであるかのように扱うことができる。
↓つまりこういう形のひとつのコントロールパーツとして扱うことができるということ。

また、ボタン数の増減がきわめて簡単に行えることもポイントのひとつ。
試しにボタンをひとつ増やしてみた。
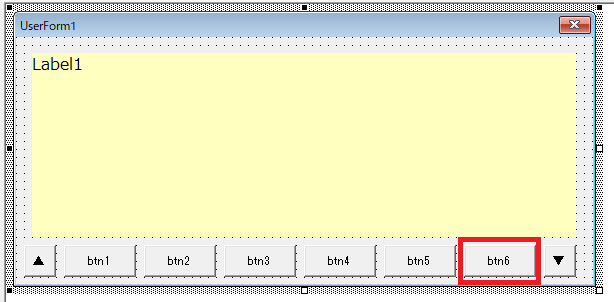
コードの変更箇所はたった1箇所。
ユーザーフォームのUserForm_Initializeメソッドのmenu.Initに引き渡すボタンを一つ増やすだけで済む。
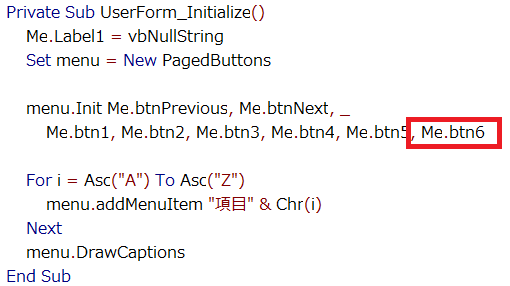
ボタンを減らした場合も同様に、menu.Initに引き渡すボタンを減らすだけ。
今回は紹介しないが、動的なコントロールの生成と、APIによるフォームのサイズ変更を組み合わせると、フォームサイズの変化に合わせて表示ボタン数が変わる柔軟なメニューを作成することもできる。
仕組みの解説
さて、どういうことなのか説明しよう。
今回はクラスモジュール、コントロールイベントの共通化、自作イベントなどのテクニックを利用している。
まずPagedButtonsオブジェクトの初期状態はこんな感じの構成。
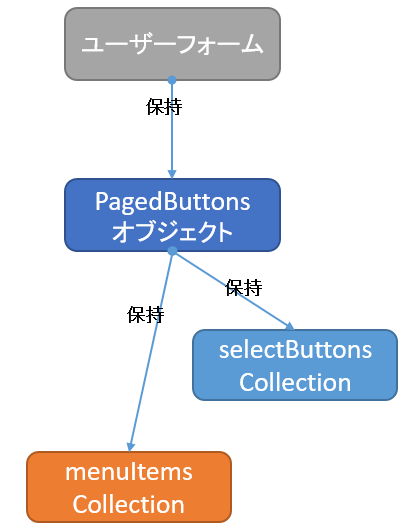
PagedButtonsオブジェクトにボタンがひとつ渡されると、SelectButtonオブジェクトを生成し、そこにボタンを保持させて自身が持つSelectButtonsCollectionに格納する。
また、このときに自身(PagedButtonsオブジェクト)をSelectButtonオブジェクトに保持させる。
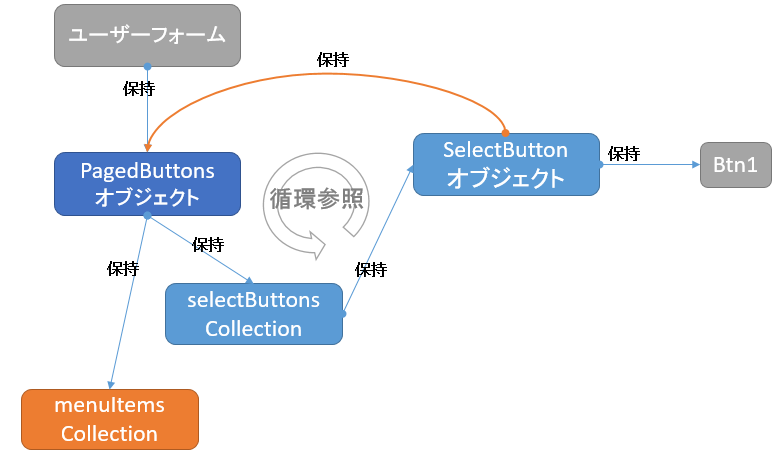
ここで循環参照が発生してしまうが、イベントのコールバック処理で必要になるので仕方がない。
オブジェクトにReleaseObjectプロシージャを作ってあるのはそのためだ。
※SelectButtonオブジェクトからPagedButtonsオブジェクトへの参照をオレンジ線にしたのは、後の図で青だと見づらくなった為で、特別な意味はない。
PagedButtonsオブジェクトにボタンやメニュー項目を引き渡していくと、最終的なオブジェクトの関係図はこうなる。

※実際にはボタンはInitプロシージャで一気に引き渡されますが、最初の図は1つにしておかないとややこしかったので説明の都合上、引き渡していくという表現にしています。
ページ切り替えのボタンまで図に含めると複雑すぎるので割愛したが、ページ切り替えを行うとmenuItemsコレクションから項目が取得され、それぞれのSelectButtonオブジェクトに格納される。
ユーザーがボタンをクリックした際のプロシージャ呼び出しをシーケンス図で書くとこんな感じ。
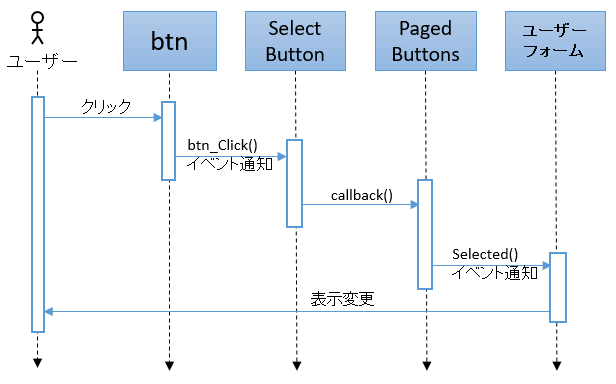
callbackとSelectedでそれぞれボタンのCaptionが引き渡されるので、ユーザーフォーム側でどのボタンがクリックされたのか検知できる。
利用しているテクニックについての参考記事
thom.hateblo.jp
thom.hateblo.jp
thom.hateblo.jp
thom.hateblo.jp
循環参照についての参考記事
今後の展望
動的なコントロールの生成を組み合わせると柔軟性が高まる。以下の記事で動的にラベルを生成させているので紹介。
thom.hateblo.jp
たとえば上記の記事ではSet L = Me.Controls.Add("Forms.Label.1")としているが、Set btn = Me.Controls.Add("Forms.CommandButton.1")とすれば、新しいボタンが生成されて変数btnに格納される。
あと今回はPagedButtonsのSelectedイベントでキャプションを返しているが、addMenuItemメソッドをSub addMenuItem(menu_caption As String, data As Variant)に改造して押された項目に対応するdataを返すようにすれば更に柔軟性が高まる。たとえば押したボタンに応じたオブジェクトが返ってくると、そこから色々操作できて面白い。
ただし、今後の展望に書いた案については、きっとこの記事に興味がある皆さんが素晴らしい実装を作ってくれるので私はこれ以上作らない。面倒だし。。